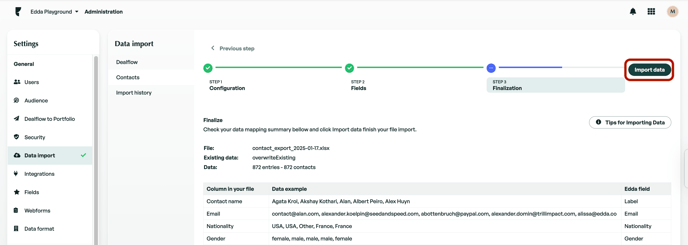
This guide walks you through how to import contacts to the Contacts Center in Edda, including how to prepare your data, handle validation, and even update data in bulk.
Configuration
|
User Role |
Import Access |
Note |
|
Administrator |
✅ Yes |
Full Access |
|
Moderator |
✅ Yes |
Full Access |
|
Investor |
✅ Yes (with conditions) |
|
Pre-requisites and must know before importing data
-
You can prepare your custom fields in advance, but you can also create them directly during the import process when mapping fields.
-
Make sure your data matches Edda’s expected formats. See the Field Type & Validation Rules section below for guidance.
-
⚠️ Imports can’t be undone. While we have a default “Entry Date” field that helps you track a contact is added, we still recommend tagging each batch using a list or tag field (e.g. “Batch 1, July 25”). This makes it easy to filter and delete if needed.
-
For bulk updates: you can export existing data, make changes in Excel, then reimport with the overwrite existing values option.
Filed Type and Validation rules whilst completing the template
To ensure accuracy, the system applies validation rules based on the type of data you’re importing. Here’s a breakdown of the rules:
|
Field Type |
Example Fields |
Validation Rules |
|
Short Text Field |
Taxi ID |
Accepts any text (max 500 characters). |
|
Long Text Field |
Description |
Accepts longer text entries. |
|
Date Field |
Deal Date |
Format DD/MM/YYYY. The system also allows choosing other format like MM/DD/YYYY or YYYY/MM/DD. |
|
Link Field |
|
Start with https:// |
|
List Field |
Activity, Country |
Must contain one item per cell, matching Edda’s lists. |
|
Tag Field |
Investors, Keywords |
Allows multiple values, separated by commas. |
|
Amount Field |
Amount |
Accepts formats like 2M or 2,000,000. |
Importing your data
* We highly recommend trying the process with a small sample of data before importing hundreds/thousands of deals.- Sign in to Edda and go to settings.

- Select Data Import and choose Contacts.
-
You can download the custom-provided template specific to that pipeline, which will export all the fields as columns along with a sample of the contacts.

* Tip: You can upload your own template and choose which fields the data should be imported into. If you want to modify specific data or upload particular fields, you can select them from the Contacts table view and export only the selected fields.
-
Fill in the template with your data then upload it.

-
Choose how duplicated data is handled

-
Edda automatically matches the fields with the corresponding columns in your file. However, the auto-match may be incorrect if the naming in the file varies or due to other factors. Please review and select the correct fields from the dropdown list to ensure all fields match the appropriate columns. You can also choose “Ignore” to skip importing data for specific fields and fix it to rectify formatting or other issues.

- Select the correct field to import the information to (each field in the validation dropdown is a field on Edda)
- Discover any validation matching errors (the system detects them automatically)
- Select the correct field to import the information to (each field in the validation dropdown is a field on Edda)
- Correct any errors that are displayed by clicking on the Fix button

- If one of the file fields is not present on Edda, you can click on Select field>Create Custom field

-
Validate and complete the import
Once every field has passed validation, you can validate and move on to the final check verification.

✏️ Add Or Replace Contact Data Using Import
A great use of the import feature is to update multiple contacts at once using Excel. For example, let’s say you’ve added a new custom field like “Areas of Interest” and want to apply values to several contacts at once.
-
Go to the Contacts Center and use the table settings to export your contacts as an Excel file.
-
Make sure the export includes First name and Email — these are essential for matching contacts correctly during re-import.
-
Add or update the values in Excel (e.g. fill in the new field for each contact).
-
Return to Settings>Data Import>Contacts, import module, and upload your updated file.
-
In the “Existing Data” section, choose Overwrite existing values.
-
Proceed with field mapping and complete the import.

If there is anything you need further assistance with, please contact our support team on the platform, we are always happy to assist.
