What is an MCP and what are its capabilities?
MCP (Model Context Protocol) is an open-source standard for connecting AI applications to external systems.
Using MCP, AI applications like Claude can connect to data sources (e.g. local files, databases), tools (e.g. search engines, calculators) and workflows (e.g. specialized prompts, enabling them to access key information and perform tasks on behalf of the user.
When you connect Edda MCP server to an AI tool like Claude, you expose Edda data to AI platforms
Read Actions Restrictions
Access to data through the MCP respects the same role and permission settings configured in Edda. Users will only be able to query data they are authorised to access. To check user permissions in Edda: click the profile icon (top right) → Settings → Users → User profile.
* This integration is currently read-only. Write, update, and other actions are in development.
Read actions 📖
All read actions are permitted across Dealflow, Portfolio, and Contacts. AI can query, filter, summarise, and present Edda data in any format like tables, charts, paragraphs, or exportable documents. The more precise the prompt, the more accurate data you get out of it.
| Module | What AI can read | Example query |
|---|---|---|
| Dealflow | Companies, stages, pipelines, fields, owners, sources, tags and more | "List all companies rejected in the last 6 months in Pipeline X" / "Which companies in the New stage have no owner assigned?" |
| Portfolio | Fund companies, valuations, investment operations, metrics, share classes, and more | "What is the total amount divested across all companies in a specific fund?" / "Show me all open investments with their current valuation and % acquired" |
| Contacts | Contact details, linked companies, job titles, emails, relationship strength, and more | "List all contacts tagged as |
Note: In some cases, rephrasing your query may improve results. For example, "notes added last month" may work better than "notes posted last month." If a query returns unexpected results, try adjusting the wording or ask again.
Users who can configure: Owners. On an organization account, only an Owner can add the connector (Claude) or set up the agent (Copilot). On a personal Claude account, any user can add it themselves.
Connecting Edda to Claude :
For Claude Owner :
If your Claude account is part of an organization, only an owner can add the Edda connector for the whole team. Once it's added, every member of the organization can connect their own Edda account to it (see the next section).
1. Log in to your Edda account.
2. In the web version of Claude (this currently can't be done from the desktop or mobile app), go to Organization Settings and click Connectors.
3. Click “Add,” then choose “Custom” and select “Web” from the dropdown.
4. Give the connector a name (for example, “Edda MCP”) and paste in the Edda MCP URL, using the one that matches your server region. MCP Server URL:
EU https://eu-dealflow.edda.co/api/v2/mcp
US https://us-dealflow.edda.co/api/v2/mcp
AS https://as-dealflow.edda.co/api/v2/mcp
If you're on a custom server, use your organization's subdomain instead, for example, https://acme-dealflow.edda.co/api/v2/mcp.
Tip: You can confirm which server you're on by checking the URL in your browser when logged into Edda (e.g. eu-dealflow.edda.co, us-dealflow.edda.co, etc.) — this prefix is what you'll use in the MCP URL above.
5. Click “Add” in the bottom-right corner.
6. Click “Connect.”
For Non-Owner Users (Organization Accounts) :
Once Claude owner has added the Edda connector, it will appear on your account automatically. Make sure you're logged in to your Edda account before connecting.
1. Log in to your Edda account.
2. In Claude, go to Settings and click Connectors.
3. Find the Edda connector and click “Connect.”
4. On the pop-up window, click “Agree and allow access.”
5. Once connected, a checkmark will appear next to Edda. Click on the connection and change the tool permission from “Needs approval” to “Always allow,” so Claude doesn't ask for confirmation every time it uses Edda.
Note: If the connector doesn't appear right away in the Claude app, fully quit and reopen the app. It can take a moment to sync after an admin adds it.
Note: If you have access to multiple Edda workspaces, Claude will default to one automatically. Mention the workspace by name in your prompt if you need a specific one.
For Personal Claude Accounts :
1. Log in to your Edda account.
2. In Claude, go to Settings and click Connectors.
3. Click “Add,” then “Add custom connector.” This option is currently only available in the web version of Claude. If you're using the desktop or mobile app, complete this step at claude.ai in your browser first.
4. Give the connector a name (for example, “Edda MCP”).
5. Paste in the Edda MCP URL, using the one that matches your server region. MCP Server URL:
EU https://eu-dealflow.edda.co/api/v2/mcp
US https://us-dealflow.edda.co/api/v2/mcp
AS https://as-dealflow.edda.co/api/v2/mcp
If you're on a custom server, use your organization's subdomain instead, for example, https://acme-dealflow.edda.co/api/v2/mcp.
Tip: You can confirm which server you're on by checking the URL in your browser when logged into Edda (e.g. eu-dealflow.edda.co, us-dealflow.edda.co, etc.) — this prefix is what you'll use in the MCP URL above.
6. Click “Add,” then click “Connect.”
7. Check Settings and Connectors. Edda should now show as “Connected” with a checkmark. Click on the connection and change the tool permission from “Needs approval” to “Always allow.”
8. Test the connection by asking Claude something like: “List my available pipelines in my workspace.”
Connecting Edda to Google Gemini (Entreprise account)
For Gemini Admin
If your Gemini account is part of an organization, only an Admin can add the Edda connector for the whole team. Once it's added, every member of the organization can connect their own Edda account to it (see the next section).
1. Log in to your Edda account.
2. Go to Gemini, and select Settings at the bottom-left, then click [name]'s Team (e.g. "John Doe's Team") and choose Manage team. Or, if Add MCP Server is visible on the main page, you can select it directly to skip this step.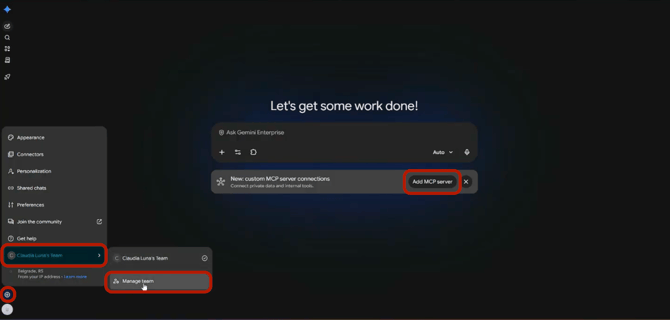
3.
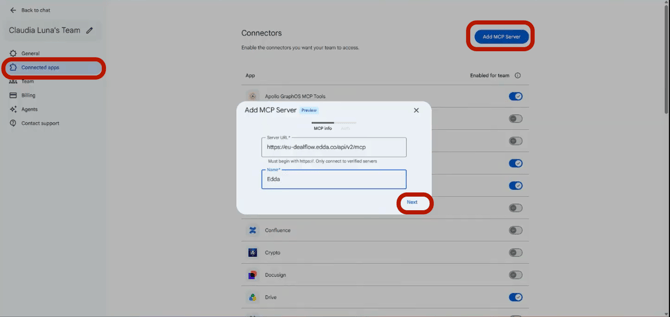
Go to Connected apps → Add MCP Server and fill in the following:
- Name: Edda
- Server URL: Use the URL that matches your region:
-
Region URL EU https://eu-dealflow.edda.co/api/v2/mcp US https://us-dealflow.edda.co/api/v2/mcp AS https://as-dealflow.edda.co/api/v2/mcp Custom Use your organization's subdomain instead, for example, https://acme-dealflow.edda.co/api/v2/mcp -
Tip: You can confirm which server you're on by checking the URL in your browser when logged into Edda (e.g. eu-dealflow.edda.co, us-dealflow.edda.co, etc.) — this prefix is what you'll use in the MCP URL above.
-
When Ready select "Next"
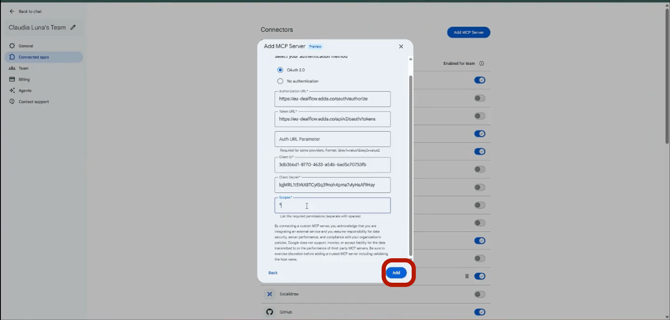
4. Enter the Oauth data as below. ⚠️ Make sure all URLs below match your region (replace EU with US, AS or your Custom domain if needed).
| Field | Value |
|---|---|
| Authentication method | OAuth 2.0 |
| Authorization URL | https://eu-dealflow.edda.co/oauth/authorize |
| Token URL | https://eu-dealflow.edda.co/api/v2/oauth/tokens |
| Authorization URL Parameters | (leave blank) |
| Client ID | 3db3b6d1-8770-4633-a54b-6ad5c70753fb |
| Client Secret | lqjMRL1t5VkX8TCyISq39noh4pma7vIyHeAf9Hay |
| Scopes | * |
-
Select "Add" when ready.
5.Go back to the Gemini home page and click the Connectors icon in the chat toolbar. Find Edda MCP in the list and click Connect. You'll be redirected to Edda, click Continue to Edda to proceed.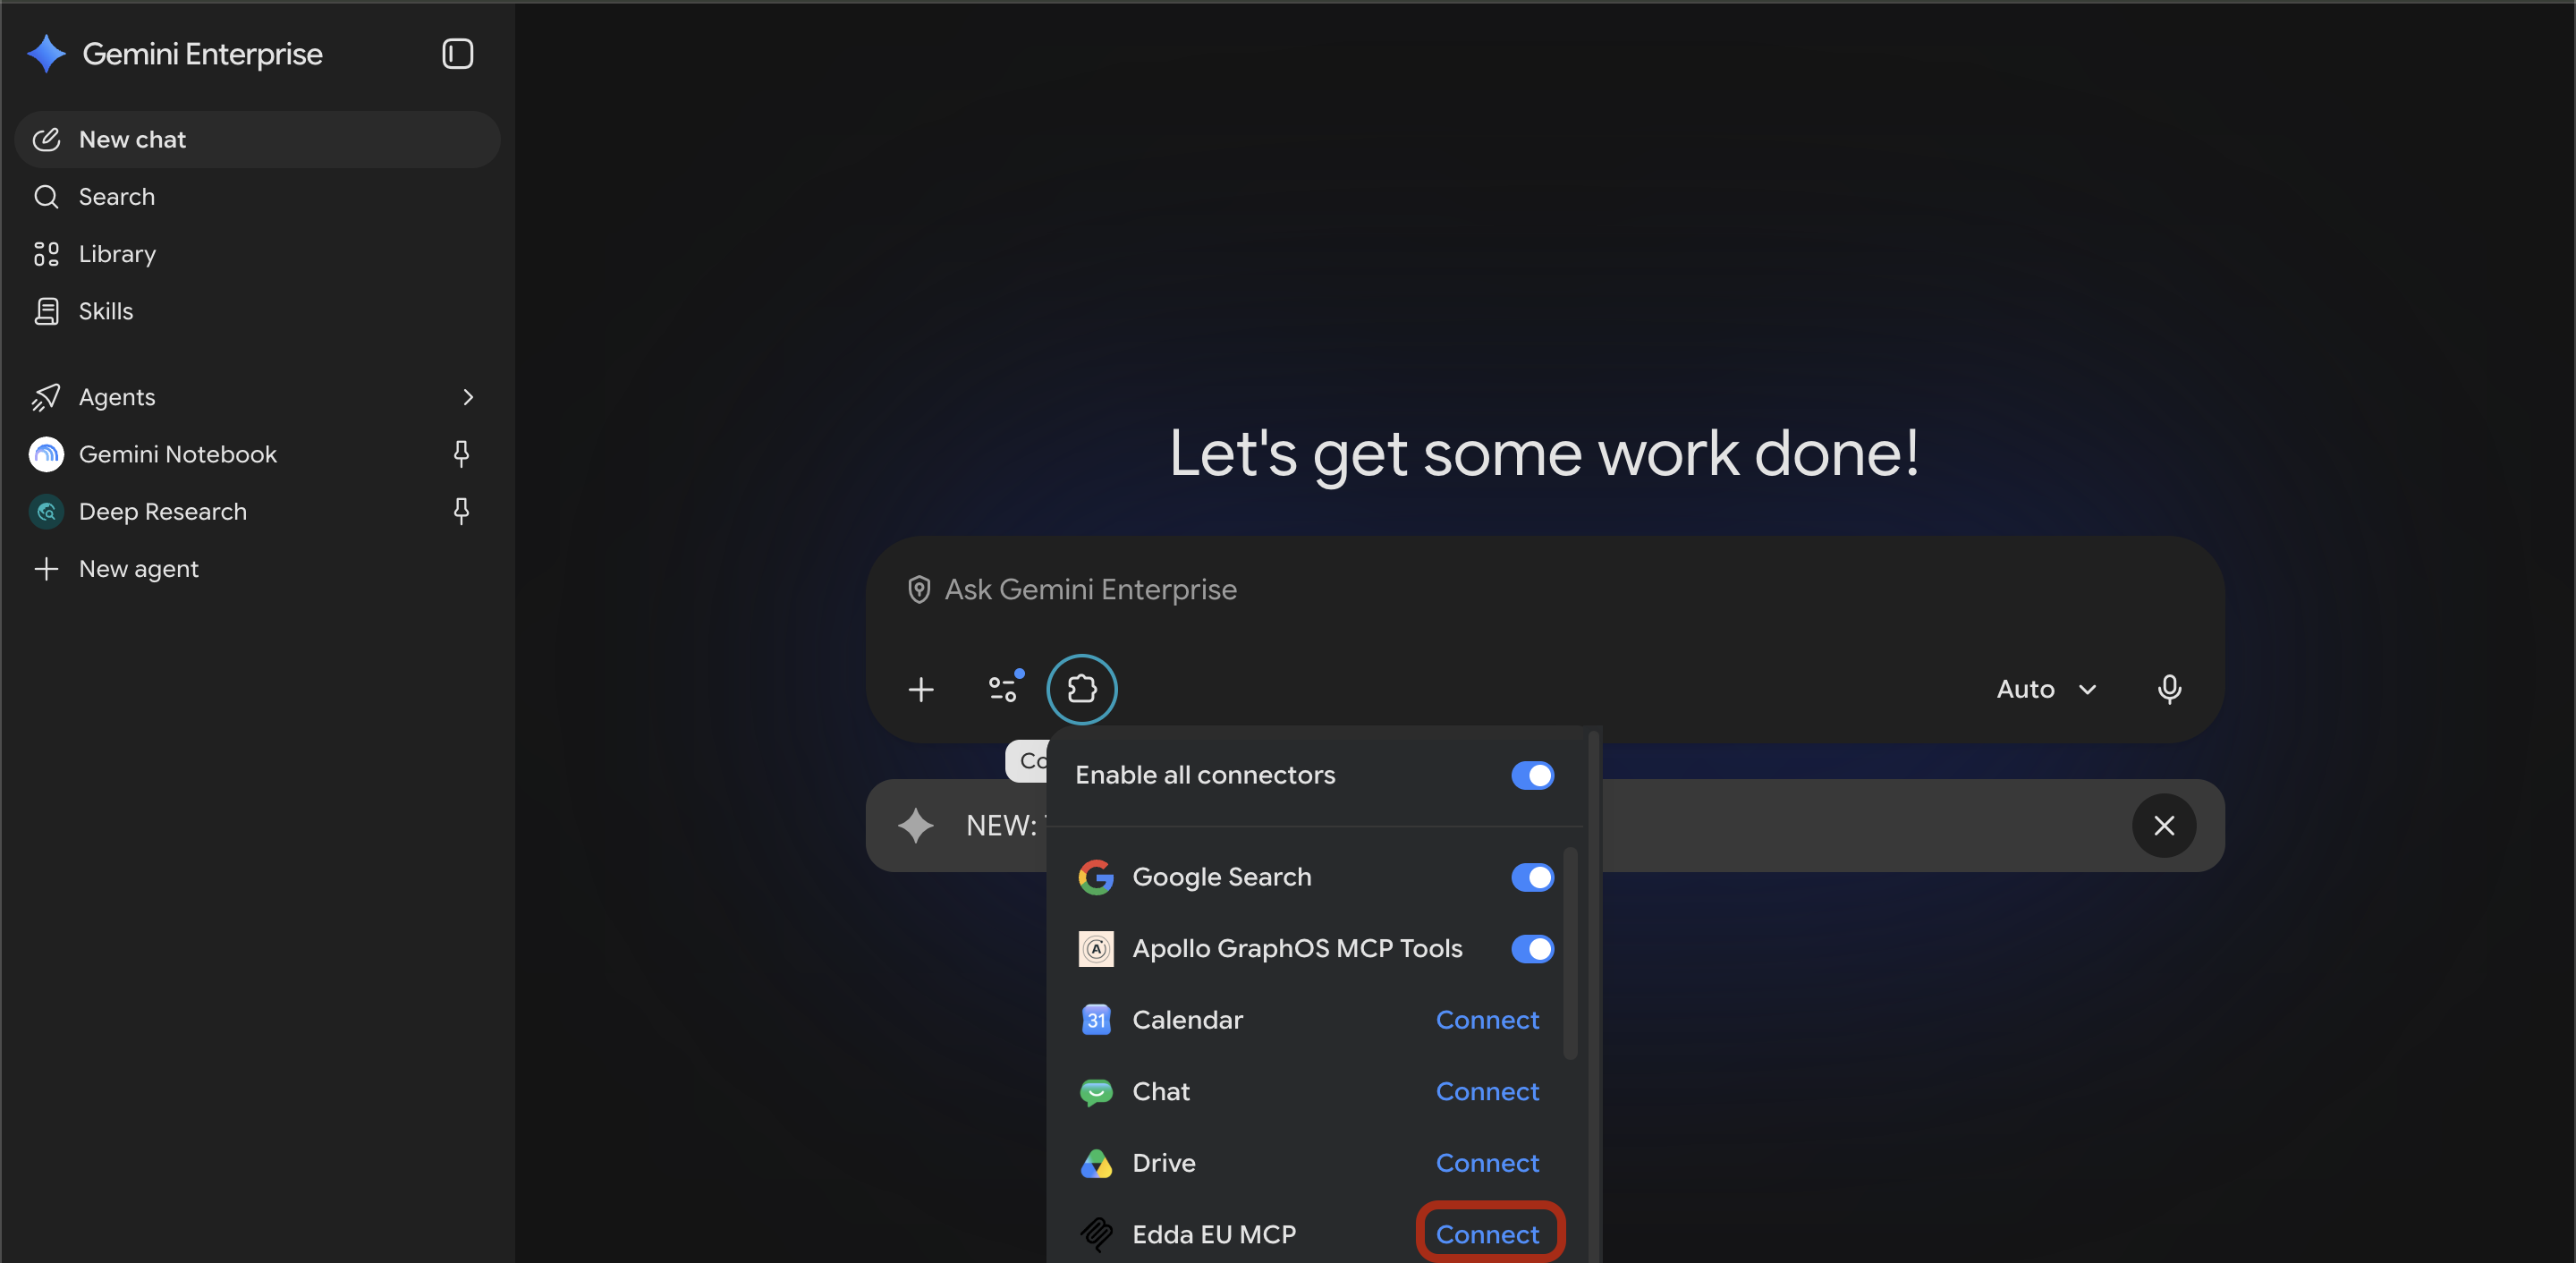
6. Authrorize Gemini to connect Edda and this should be it to allow you to Connect
For Non-Admin Users (Organization Accounts)
Once your Admin has completed the setup, you can connect Edda MCP on your account by following steps 5 and 6 above.
Connecting Edda to Microsoft Copilot :
Setting up Edda in Copilot is more involved than in Claude. It must be done by an Administrator through Copilot Studio in a web browser (Copilot Studio is not available as a desktop or mobile app). Once it's set up and shared, each team member connects individually.
For Copilot Administrators:
Step 1: Create Agent:
1. Log in to your Edda account.
2. Go to Copilot Studio, and in the left navigation bar click “Agents”.
3. Next to "New agent" button click on the downward chevron and select the second option "Agent - Standard ".
4. Give it a name. You don't need to change any other settings.
5. Click “Create,” and allow a few minutes for Copilot Studio to finish provisioning the agent. Wait until the Agent status turns green and reads “Ready” before continuing.
Step 2: Create Tool:
1. In the left navigation bar, go to "Tools"
2. Click “+ New tool.”
3. Select “Model Context Protocol (MCP).”
4. In the Server Name field, give the tool a name.
5. Add a description of at least 30 characters. This field is required.
6. In the Server URL field, paste in the Edda MCP URL, using the one that matches your server region. MCP Server URL:
EU https://eu-dealflow.edda.co/api/v2/mcp
US https://us-dealflow.edda.co/api/v2/mcp
AS https://as-dealflow.edda.co/api/v2/mcp
If you're on a custom server, use your organization's subdomain instead, for example, https://acme-dealflow.edda.co/api/v2/mcp.
Tip: You can confirm which server you're on by checking the URL in your browser when logged into Edda (e.g. eu-dealflow.edda.co, us-dealflow.edda.co, etc.) — this prefix is what you'll use in the MCP URL above.
7. Under Authentication, select “OAuth 2.0” (the last option in the list). “Dynamic discovery” should already be selected. If not, select it.
8. Click “Create.”
Note: The newly created tool won't show up right away. Refresh the page if you don't see it.
Step 3: Add the MCP tool to the agent :
1. When the tool is created, return again on the agent page by : clicking on "Agents" on the left navigation bar and click on the newly created agent.
When the page is loaded, scroll to “Tools” and click “Add tool.”
2. Search for MCP in the available filters and select the tool you created in Step 2. This opens the “Add tool” modal.
3. At the bottom of the modal, click “Not connected,” then “Create a new connection.” On the next modal, click “Create” without entering a display name.
4. A new window opens. Click “Agree and allow access.”
5. The window closes and the “Add tool” modal reappears. Click “Add” and wait for it to finish.
Note: The connection's display name defaults to “Credential Manager.” This is expected behavior from Microsoft's connector system, not an error.
Step 4: Test the connection :
1. In the test chat panel on the right, send a message. For example, try “Give me the list of available pipelines inside my workspace.”
2. If you're prompted with “Let's get you connected first,” click “Open connection manager.”
3. On the “Manage your connection” page, click “Connect” next to the “Not connected” status.
4. On the new modal, click “Submit.” The status will change to “Connected.”
5. Go back to the test chat, click “Retry,” and resend your message.
Note: The first connection attempt sometimes fails. If it does, simply retry.
Step 5: Publish the agent :
1. Once the agent returns a correct answer, click “Publish” in the top right.
2. In the pop-up, check “Force newest version” and click “Publish.”
3. Allow a minute or two after publishing before moving on to the next step.
Step 6: Add the Microsoft Teams channel :
1. On the same page in Copilot Studio, click the “Channels” tab.
2. Select “Microsoft Teams + Microsoft 365.” In the modal that opens, click “Add channel” and wait a few seconds. When this is done you can Edit the channel and select "User can add this agent to a team" and "Use this agent for a group and meeting chat". Save again.
3. Under “Agent preview,” click “See agent in Microsoft 365.” This opens your Microsoft account and the new Edda agent automatically - it will open Copilot ai Web page.
Add the agent.
Please wait 5 minutes after adding the agent.
When the Edda agent is added to Copilot, test the connection to confirm it's working correctly.
Note: It's possible that Copilot will return a blank answer on the first couple off attempts. This is expected - follow the steps below to resolve it.
Steps:
- Start a new chat in Copilot.
- In the new chat, type
@edda. Using "@" allows you to add the agent to the chat. - It may still be necessary to refresh the page a couple of times before the agent responds. This is a known behavior on Microsoft's side, not related to Edda.
- Once the refresh takes effect, the agent will return a response, and the "Connection Manager" option will be displayed again.
- Click Connection Manager, then click Connect again.
- After reconnecting, type your prompt as usual - it will now work correctly.
Sharing access with your team :
1. In Copilot Studio, go to “Agents” and select Edda from the list.
2. Open the “Channels” tab and select “Microsoft 365 and Teams.” A sidebar will open.
3. Under “Agent preview,” click “Availability options.”
4. Click “Copy link” for Microsoft Teams.
5. Share this link with everyone on your team who needs access.
Note: Publishing the agent does not automatically grant access to every user in the organization. The link currently needs to be shared manually with each person who needs it.
For Non-Admin Team Members (also adding to Microsoft Teams):
Once your administrator has published the agent and shared the Microsoft Teams link with you, you'll need to connect it to your own account. Every team member needs to complete this individually, whether connecting for the first time or on a new device.
1. Open the Teams link your administrator shared with you. (You can also open it in a browser by clicking “Use the web app instead.”)
2. Click “Add,” then “Open with Copilot.”
3. Ask the agent a question. You'll be prompted to connect.
4. Click “Open connection manager,” then “Connect,” then “Submit.” The status will change to “Connected.”
5. Return to the chat and re-type your question.
Note: This same flow needs to be repeated any time you connect Teams with Copilot for the first time on a new device or session.
Note: After an agent is published and shared, it can take anywhere from a few minutes up to around 24 hours to become fully available across Teams and Copilot. If it isn't working right after setup, wait a while and try again.
If you run into any issues setting up either integration, reach out to your Edda contact or Edda support.
Edda MCP - Tools Available in This Release :
Remember: all tools listed below are read-only. Write tools (create / update / delete) are in development and will follow in a future release.
|
Module |
Tool |
What it does |
|
Workspace & Admin |
List workspaces |
Everything the authenticated user can access |
|
|
Get current user |
Profile and permissions of the authenticated user |
|
|
List workspace users |
Team roster; find a colleague or user ID |
|
|
List available fields |
All system + custom fields with IDs, types, names |
|
|
Get field options |
Valid values for a dropdown/tag field |
|
|
List notifications |
The user's alerts, filterable by app |
|
Companies |
Search companies |
Find companies by name; fuzzy matching corrects typos |
|
|
List all companies |
Browse/paginate the whole workspace, sorted by most recently updated |
|
|
List companies in a pipeline |
All deals in a named pipeline |
|
|
List companies in a stage |
Deals at a specific stage; optional date-range filter |
|
|
List companies in a fund |
Portfolio companies, filterable by status (open/closed/partly closed) |
|
|
Get a company |
Full profile: stage, pipeline, score, referents, custom data |
|
|
List company fields |
All field values, default (sector, geography, website) and custom |
|
|
List company owners |
Who is responsible for / covering the company |
|
|
List company sources |
Where the deal came from and who referred it |
|
|
Company timeline |
Full activity log, filterable by ~30 action types |
|
Pipelines & Stages |
List all pipelines |
Deal/portfolio funnels with company counts |
|
|
Get a pipeline |
Pipeline metadata and configuration |
|
|
List stages in a pipeline |
Stages in display order, with company counts |
|
Funds & Portfolio |
List all funds |
Active funds with company counts |
|
|
Get a fund |
Team members and company status breakdown |
|
|
List investment & exit operations |
Buy/sell transactions, amounts, dates, positions for a company |
|
|
List valuations |
Valuation history / mark-to-market over time for a company |
|
Metrics |
List metric types |
What's tracked workspace-wide (ARR, headcount, NPS...) with IDs |
|
|
List metrics on a company |
Actual KPI values for a company |
|
Contacts |
List internal contacts |
People linked to at least one company |
|
|
List external contacts |
Standalone contacts not tied to any company |
|
|
List contacts on a company |
Every contact linked to a given company |
|
|
Look up contacts by email |
Find contacts by one or more email addresses |
|
|
Get a contact |
Full profile: language, country, relationship-strength score |
|
|
List contact fields |
Default (email, phone, nationality, background) plus custom fields |
|
Emails |
List all emails |
All emails in the workspace (no entity context) |
|
|
List emails for a company |
Emails tied to a company |
|
|
List emails for a contact |
Emails with one person |
|
|
Get email metadata |
Linked companies/contacts/attachments; no body |
|
|
Get email content |
Email HTML body (also marks the email read) |
|
Tasks |
List all tasks |
Across pipelines and funds; date-filterable |
|
|
List my tasks |
Tasks assigned to the current user |
|
|
List tasks on a company |
Company-specific tasks |
|
|
Get a task |
Full details and assignees |
|
Notes, Events & Docs |
List all notes |
All notes across the workspace |
|
|
List my notes |
Notes authored by the current user |
|
|
List notes on a company |
Longer-form entries with authors, attachments, reactions |
|
|
List company comments |
Comments, replies, and reactions on a company |
|
|
List events on a company |
Meetings/calls with participants and linked emails |
|
|
List documents on a company |
Files/folders, with text search over document names |
|
|
Get a document |
Metadata plus preview URL and temporary download link |
Please Note the following :
|
Point |
Detail |
|
We control tools, not outputs |
We can't control AI responses or artifacts, only which tools are exposed. Everything else depends on the AI's interpretation and the data in Edda. |
|
Model behavior varies |
Copilot needs more hand-holding and specific phrasing. Claude is usually better at interpreting the user's query and pulling the right data. |
|
Margin for error |
Because interpretation varies, there's always some margin for error - Please make sure you review AI data before you act on it. |
|
Permissions are enforced |
AI cannot override user permissions. If a user can't access a fund in Edda, they won't be able to access it via Claude/Copilot/Gemini either. |
|
Company Users |
This version excludes company users - It is not available for them |