This guide will give you everything you need to know regarding the companies data import feature within Edda Dealflow. This article will cover:
Pre-requisites and must know before importing data
-
Preparing your Dealflow fields and stages
-
Preparing your data set
-
Filed Type and Validation rules
-
How to edit batches of data using this feature
-
This feature's purpose is to let Edda users import data to their Dealflow in a simple way. This feature is available to every user, providing you with the ability to easily upload batches of deals to the platform.
- Your first data import is always a good occasion to clean your historical data, performing actions such as: removing duplicates, unnecessary data, outdated deals etc...
-
⚠️ Important Note: Once your import has been completed, it cannot be reverted or cancelled. However, if you can identify the imported deals, you can batch delete them from within the table view feature in Dealflow.
Preparing your Dealflow Fields and Stages
-
We recommend creating your custom fields and workflow stages/columns before starting your imports. This will guarantee our Dealflow system is fully ready.
-
When creating your custom fields, ensure the correct data types have been chosen for each field.
Filed Type and Validation rules whilst completing the template
To ensure accuracy, the system applies validation rules based on the type of data you’re importing. Here’s a breakdown of the rules:
|
Field Type |
Example Fields |
Validation Rules |
|
Short Text Field |
Taxi ID |
Accepts any text (max 500 characters). |
|
Long Text Field |
Description |
Accepts longer text entries. |
|
Date Field |
Deal Date |
Format DD/MM/YYYY. The system also allow choosing other format like MM/DD/YYYY or YYYY/MM/DD. |
|
Link Field |
Website |
Start with https:// |
|
List Field |
Activity, Country |
Must contain one item per cell, matching Edda’s lists. |
|
Tag Field |
Investors, Keywords |
Allows multiple values, separated by commas. |
|
Amount Field |
Pre-money Valuation, Amount |
Accepts formats like 2M or 2,000,000. |
Importing your data:
* We highly recommend trying the process with a small sample of data before importing hundreds/thousands of deals.- Sign in to Edda Dealflow and go to settings.

- Select Data Import and choose Dealflow.
-
From there, you will have to choose a destination pipeline (in which the data will be uploaded)
* If the selected pipeline has an automation rule set, please disable it before starting the data import and then re-activate it after the import is complete. -
You can download the custom-provided template specific to that pipeline, which will export all the fields as columns along with a sample of the companies in that pipeline.

* Tip: You can upload your own template and choose which fields the data should be imported into. If you want to modify specific data or upload particular fields, you can select them from the Dealflow table view and export only the selected fields.
-
Fill in the template with your data then upload it.

-
Choose how duplicated data is handled e.g. multiple companies with the same name and information. (more details below)

-
Edda automatically matches the fields with the corresponding columns in your file. However, the auto-match may be incorrect if the naming in the file varies or due to other factors. Please review and select the correct fields from the dropdown list to ensure all fields match the appropriate columns. You can also choose “Ignore” to skip importing data for specific fields.
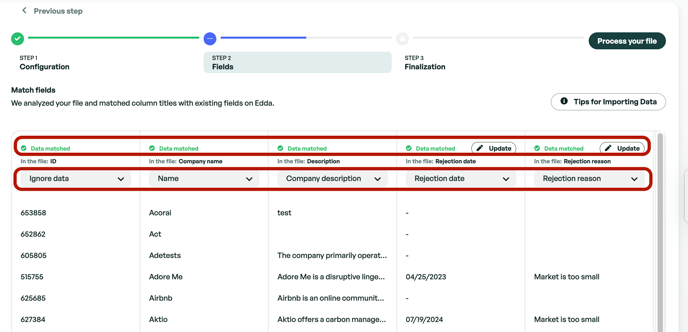
Fields mapping and data validation process
- The cleaner the data, the better your Dealflow will be. This is why we have a data validation process in place, whether you want to import dates, numbers, lists, or tag values, everything has to be formatted the correct way.
- For each field/column it will be necessary to :
-
Select the correct field to import the information to (each field in the validation dropdown is a field from your Dealflow)
-
Discover any validation matching errors (the system detects them automatically)
-
Correct any errors that are displayed
-
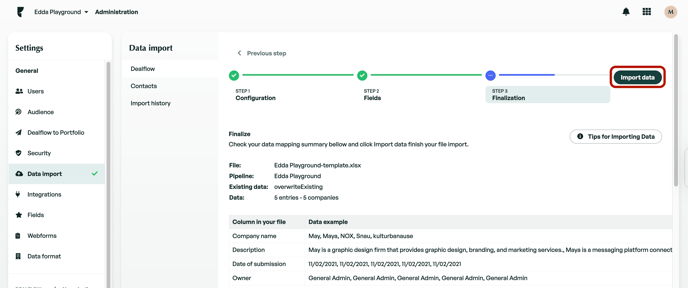
Validate and complete the import

Once every field has passed validation, you can validate and move on to the final check verification.
Add or replace values using the Data import feature on Dealflow
- You've added a new qualification keyword to the Dealflow and would like to apply it to several companies at once. These are the steps to achieve this in a few minutes:
-
Export your pipeline as an XLS file (from the pipeline selector)
-
Delete all other columns except for the company name (used for matching, VERY IMPORTANT) and Keywords or you can select which fields to export from Dealflow table view.
Tip: Make sure the ‘Stage’ column is included in your file. This ensures that:
-
Companies being updated will remain in their current stage.
-
If you’d like to bulk update stages, you can add the relevant stage data in the file.
⚠️ If the ‘Stage’ column is missing during the import process, all companies will be placed into a single stage.
column column -
-
Proceed to make your changes (adding the keyword to several companies).
-
Once your modifications are completed, navigate to the import module, choose the right pipeline and upload your file.
-
In the "For existing companies" section, choose the option: overwrite existing values -> This is a key step.
-
Then hit "next step", validate the columns and finish the import.
- Once your import has been fully processed, you can verify the result and see that your keywords have been successfully applied to all the edited companies.
- We hope that this document helped. Don't hesitate to suggest some modifications to this article.
- One of the great things this feature provides is to let users edit batches of companies locally using an Excel file and re-import them to your Dealflow. Here is a use case :
If there is anything you need further assistance with, please contact our support team on the platform, we are always happy to assist.